使用Emacs和Hugo academic主题
Hugo academic 主题是以Hugo 为依托的个人博客主题。使用该主题可以方便的管理博客和完成的项目。本文介绍如何使用该主题。(如何使用Hugo不在本文介绍范围之内。)
1 下载
[1] 根据 hugo-academic 的 github主页 ,clone一个kick start项目:
git clone https://github.com/sourcethemes/academic-kickstart.git My_Website
[2] 更新这个项目中的academic主题:
cd My_Website
git submodule update --init --recursive
这个主题在 themes/academic 目录下。
[3] 查看示例:
hugo server
至此一个基于Hugo 和academic的个人博客就算搭建完成,接下来个性化这个网页,主要通过阅读academic的帮助文档和demo网站完成。
[4] 更新主题:
acamedic的主题更新很简单,代码如下:
$ cd themes/academic
$ git.exe remote rename origin upstream
$ git.exe fetch upstream
$ git.exe log --pretty=oneline --abbrev-commit --decorate HEAD..upstream/master
$ git.exe pull upstream
注意在windows下,可能需要输入 git.exe 而不是 git 。当输入 git 没有后缀 .exe 时,有可能找不到 git 命令。
2 示例博客解析
把 themes/academic 下的 examplesite 内容copy到主目录下,然后 hugo server 就会看到和官网一样的网站内容。接下来,我们深入的了解一下这个结构。解析的过程中我主要参考 academic 的demo网站。
2.1 特性
academic 这个主题的主要特性包括:
- 非常容易管理主页上的各个模块,包括博客,发表文章,演讲和项目。
- widgets是这个主题的一大特色。每一个模块对应一个widgets,可以对这个模块对应的widgets进行精细的个性化制定。
- 如果需要一个额外的模块,只需要定制一个widget就可以了。
- 支持markdown语法,支持 LATEX 数学公式。
- 支持社交网络链接,支持
google analysis支持Disqus评论。 - 响应式网站,并且对移动设备友好。
- 简单易用的博客发布流程。
- 多语言支持,容易配置。
2.2 配置主页
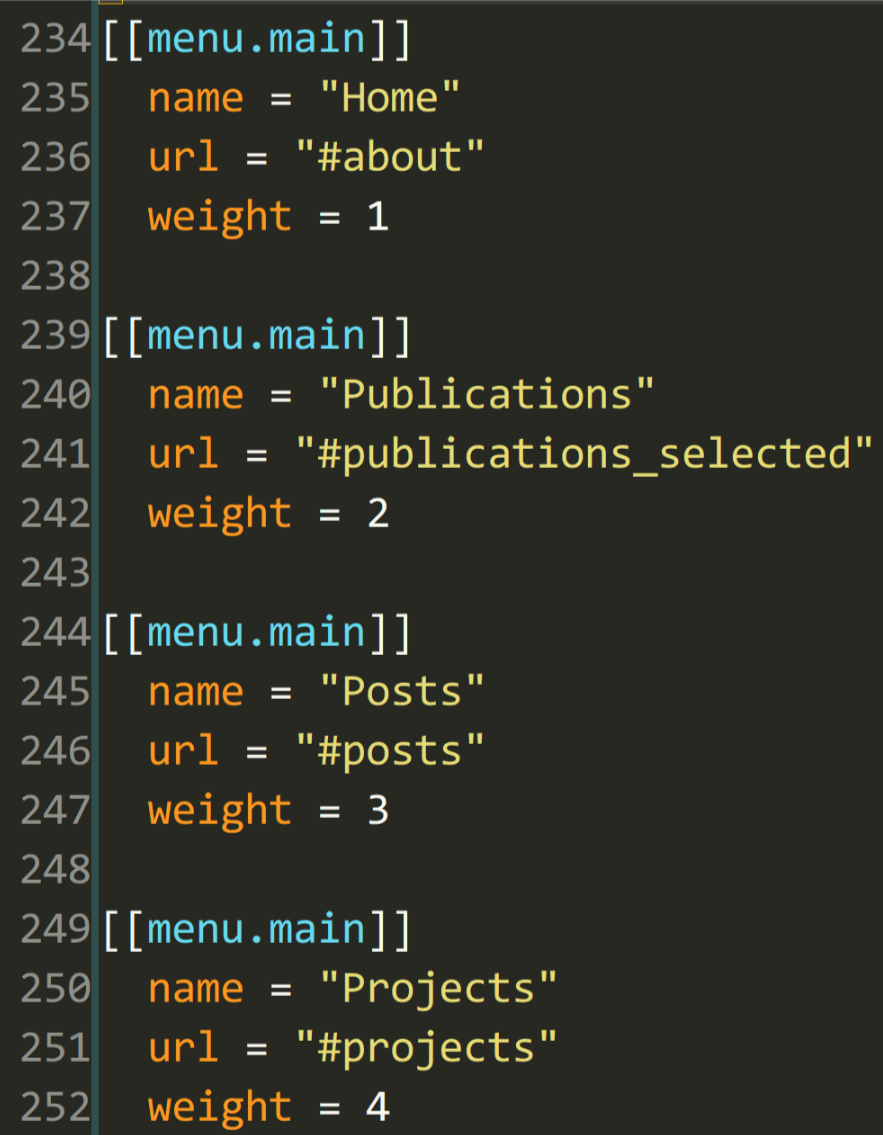
hugo 主题的配置主要是修改 config.toml 文件,这个文件负责整个博客的结构。这个文件的配置可以参照 getting start 来完成。其中值得一提的是 Navigation menu 的配置。主页上显示的navigation widget可以通过 menu.main 这个变量来配置。

其中的 Name 给出在主页中显示的名字。 url 给出在 content/home/ 目录中的文件名字。比如, Name=Home 下面的 url 是 #about ,那么在 content/home/ 目录下有一个 about.md 文件。 about.md 文件里的内容就是 Home 这个widget 对应的内容。另外,还有一个 weight 变量,这个变量指示的是 Home 在主页的title栏里显示的顺序。在 exampleSite 中 Home 显示在第一项。
注意在 about.md 中也有一个变量 weight 这个变量指示 about.md 这个模块显示的位置。根据个人喜好,通过修改 about.md 中的 weight 变量,我们可以让自我介绍这个模块显示在页面顶端,也可以让其显示在页面末尾。
在修改 config.toml 和 menu.main 对应的markdown文件时,要特别注意 config.toml 中的 weight 和各个markdown文件中的 weight 的区别。比如,我想让 Home 显示在标题栏的第一项,想让对应的 about.md 中的内容显示在主页中的最下面,那么我可以在 config.toml 中把 Home 对应的 menu.main 中把 Home 所在的 menu.main 的 weight 改的比其他的 widget 对应的 weight 都小;同时,把 about.md 中的 weight 调的比 content/home/ 中其他文件中的 weight 都大。
另外,主页中还可以显示 title 栏中没有的 widget 。比如在 exampleSite 中,主页显示了 tags 和 talks 这两个模块,但是在 =title 栏中却没有显示这两个 widget ,这样做进一步提高了主页显示内容的可定制性。
对于 content/home/ 中的各个markdown文件,可以通过修改文件中的 active 变量来指定这个模块是否显示。设置 active=false 就可以让这个模块在主页面中隐藏。
2.3 发布新内容
在上一节介绍了如何配置各个 title 栏中和 content/home/ 中各个 widget 模块的显示。 现在对 content/home/ 下的各个模块做详细的介绍。主要涉及,如何针对各个 widget 发布新的内容。
在发布新内容之前,我添加了更多的 widget 。比如,基于post 模板,我添加了 Math Computer 和 Telecommunication 模块,分别存放与数学,计算机和数字通信相关的博文。去掉了teaching和talks模块。在添加这些模块的过程中,需要在 themes/academic/layouts/partials/widgets 目录下,把 post.html 复制为 math.html computer.html telecommunication.html 并把文件中的 “post”全部替换为 “math”(在 math.html 文件中), “computer”(在 computer.html 中 ),“telecommunication”(在 telecommunication.html 文件中)。另外需要把 themes/academic/layouts/partials 目录下的 post_li.html 复制成 math_li.html computer_li.html 和 telecommunication_li.html ,同时替换相关的关键词。
为了使用Emacs 自动发布新内容,我建议使用 [[https://github.com/kaushalmodi/ox-hugo][ox-hugo]] 。通过 ox-hugo ,我们可以使用Emacs的Org来编辑博客。编辑结束,使用Emacs发布成hugo支持的markdown格式。
2.3.1 使用 ox-hugo 发布新博客
为了使用 ox-hugo 发布新内容,我定制了 org-capture-templates 变量:
 1: (setq org-capture-templates
 2:       '(
 3:         ("h" "Hugo post")
 4:         ("hm" "Math"
 5:          entry (file+olp "~/zorg/zcl.space/content_org/math.org" "Math")
 6:          (function org-hugo-new-subtree-post-capture-template)
 7:          ":math:"
 8:          :clock-in t :clock-resume t)
 9:         ("hc" "Computer"
10:          entry (file+olp "~/zorg/zcl.space/content_org/computer.org" "Computer")
11:          (function org-hugo-new-subtree-post-capture-template)
12:          :clock-in t :clock-resume t)
13:
14:         ("ht" "Telecommunication"
15:          entry (file+olp "~/zorg/zcl.space/content_org/telecommunication.org" "Telecommunication")
16:          (function org-hugo-new-subtree-post-capture-template)
17:          :clock-in t :clock-resume t)
18:         ("hl" "Life"
19:          entry (file+olp "~/zorg/zcl.space/content_org/life.org" "Life")
20:          (function org-hugo-new-subtree-post-capture-template)
21:          :clock-in t :clock-resume t)
22:         ("hm" "movie"
23:          entry (file+olp "~/zorg/zcl.space/content_org/all-posts.org" "Movie")
24:          (function org-hugo-new-subtree-post-capture-template)
25:          :clock-in t :clock-resume t)
26:         ("hl" "life"
27:          entry (file+olp "~/zorg/zcl.space/content_org/all-posts.org" "Life")
28:          (function org-hugo-new-subtree-post-capture-template)
29:          :clock-in t :clock-resume t)
30:          ))
其中函数 org-hugo-new-subtree-post-capture-template 为:
 1: (defun org-hugo-new-subtree-post-capture-template ()
 2:     "Returns `org-capture' template string for new Hugo post.
 3: See `org-capture-templates' for more information."
 4:     (let* (;; http://www.holgerschurig.de/en/emacs-blog-from-org-to-hugo/
 5:            (date (format-time-string (org-time-stamp-format  :inactive) (org-current-time)))
 6:            (title (read-from-minibuffer "Post Title: ")) ;Prompt to enter the post title
 7:            (fname (org-hugo-slug title)))
 8:       (mapconcat #'identity
 9:                  `(
10:                    ,(concat "* TODO " title)
11:                    ":PROPERTIES:"
12:                    ,(concat ":EXPORT_FILE_NAME: " fname)
13:                    ,(concat ":EXPORT_DATE: " date) ;Enter current date and time
14:                    ,(concat ":EXPORT_HUGO_CUSTOM_FRONT_MATTER+: "  ":summary \"summary\"")
15:                    ":END:"
16:                    "%?\n")          ;Place the cursor here finally
17:                  "\n")))
这样我只需要使用 org-capture 命令,就可以快速的开始撰写博客。我把这个命令绑定到快捷键 SPC o c
3 托管
完成博客撰写之后需要把博客托管到某个地方以供全球用户访问。我用github托管我的博客。我采用的是使用github提供的用户主页的方式(见这里 的Host Github User or Organization Pages)。前提条件为:
- 使用
<USERNAME>.github.io作为Github 仓库的名字; master分支上的内容必须是博客内容,即必须是hugo 生成的public的内容,不能是hugo的其他内容。
一个比较简单的实现方式是:创建两个仓库,一个用于放置Hugo的内容,一个用于放置public文件夹的内容。具体步骤如下:
- 创建一个仓库放置Hugo的内容;
- 创建
<USERNAME>.github.io仓库,这个仓库放置public文件夹的内容。 - 把
public放到.gitignore文件中; - 设定
public为submodule并指定public的remote为<USERNAME>.github.io
git submodule add -b master git@github.com:<USERNAME>/<USERNAME>.github.io.git public
如果上面的命令不能正确执行,试试下面的:
git submodule add -b master https://github.com/<USERNAME>/<USERNAME>.github.io.git public
4 流程总结
至此,我已经完成了从撰写,保存,推送的各个环节的配置。现在把博客的撰写流程总结如下:
- 通过
org-capture创建博客; - 写完之后通过
org-refile把博客放到合适的位置; - 通过
ox-hugo把org格式的文档转换成markdown格式的文档; - 自动生成 html到
public目录。
